How to: Map Microsoft Project Resources with EasyTaskLink Users
For Professional
When you publish Microsoft Project Plan, EasyTaskLink maps the resources in your MPP or you can also add these resources in a user group. You may perform the mapping at any time. Since EasyTaskLink deploy tasks to team members Outlook. Email address is require for all resources.
There are two resource mapping methods Standard and Advance methods. Project manager enter the user's email addresses directly into the Standard mapping screen. For the Advance method you may map the users that are already in the system or use the Import User from Outlook features.
Standard Method
1. The Project Manager opens a MPP file that was already published into EasyTaskLink database by clicking the EasyTaskLink...Open buttons in the EasyTaskLink toolbars from Microsoft Project.
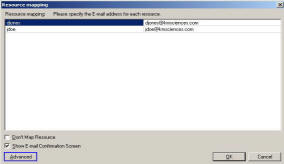
2. From EasyTaskLink drop down menu select Administration…Resource Mapping the Standard method mapping screen is displayed.
3. Enter the email address for the resources. Click the OK button to continue.
4. Click the Sync Project button to save the changes in the EasyTaskLink database.

Advance Method
1. Follow step 1 and 2 in the Standard Method.
2. Click the Advance button from the Standard Method screen.
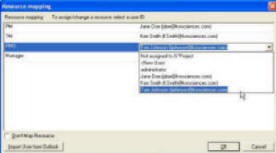
3. From the Resource Mapping screen. Map the Microsoft Project resources to match EasyTaskLink. The left hand column in the Resource Mapping screen contains Microsoft Project Resources and the right hand column is EasyTaskLink Resources. If the resources is not assign to EasyTaskLink simple select Not assigned to EasyTaskLink from the drop down menu.

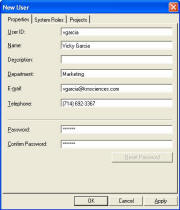
a. New User can be added by click on the New User menu from the drop down menu. Enter the new user information in the New User Properties General tab.
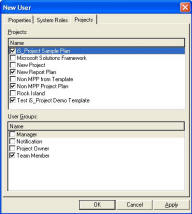
b. To assign the user in user groups or projects click the User Group tab and check the project’s check box. Then click OK to return to the Resource Mapping screen.
c. Users can be imported from the Outlook Contact List by click on the Import User from Outlook button. You have to open Outlook prior to perform this operation.
4. Click the Sync Project button to save the changes in the EasyTaskLink database.
5. Close the Microsoft Project Plan by selecting EasyTaskLink…Close.
For Workgroup
1. The Project Manager opens a MPP file by clicking the Open EasyTaskLink button in the EasyTaskLink toolbars from Microsoft Project .
2. From the EasyTaskLink drop down menu select Administration…Resource Mapping the mapping screen is displayed.
3. From the Resource Mapping screen. Map the Microsoft Project resources to match EasyTaskLink users. The left hand column in the Resource Mapping screen contains Microsoft Project Resources and the right hand column is EasyTaskLink users. If the resources is not assign to EasyTaskLink simple select Not assigned to EasyTaskLink from the drop down menu.

a. New User can be added by click on the New User from the drop down menu. Enter the new user information in the New User Properties tab.

b. Only Administrator or Project Manager can assign the user to the Administrator or Project Manager role. To assign the System Roles check the checkbox next to the role.

c. To assign the user to the user groups or projects click the Projects tab and check the Projects' and User Groups' check box. Then click OK to return to the Resource Mapping screen.

d. Users can be imported from the Outlook Contact List by clicking on the Import User from Outlook button. You have to open Outlook prior to perform this operation.
4. Click the Sync Project button to save the project in the EasyTaskLink database.
5. Close the Microsoft Project Plan by selecting File…Close.