There are three views in the Project Center: Project Plan View, Task View and Document Library View. Both the Projects and the Tasks sections of the Project Center screen can be customized to meet the needs of the user. The View button has a submenu. It allows you to select the View type.
o Standard
o Summary
o Custom
o Customize
The first three menu items are for deciding which fields (in columnar form) will be displayed in the project portion of the Project Center. Standard provides only the project name. Summary displays a standard layout of the essential project level information. Custom displays a custom format that the user defines.
The Customize button brings up the Setup View. This screen is used to customize the screen views within the system, project plan view, task view and document library view. There are three buttons on each tab which dictate the view, Fields, Columns and Other Settings…, they bring up the following screens:

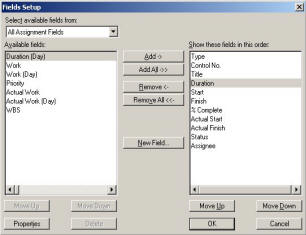
Fields Setup – Determines which fields will be displayed on the screen. Highlight a field from the Available fields list and then click the Add button to add that field to the list, or click the Add All to add all fields to the list. Remove fields with the Remove and Remove All buttons. Fields can be reorganized using the Move Up and Move Down buttons. Click OK to accept the field changes.

Column Format Setup – The list of fields defined in Step 1 are displayed on the right. Highlight a field to change the field properties. Format lets you change how numbers and dates will be displayed. Caption determines what will be displayed for this field in the column header. Width formats the width of each column, in characters. Select Align to specify how the data within each field will be justified; left, center, or right.

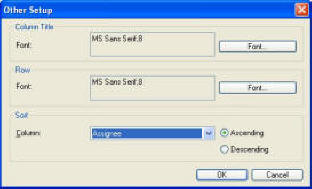
Other Setup – This screen allows you to determine the font which will be used for the column headings and fields in the rows. It also provides a place to set the sort for the displayed data. Click the Font button and a font screen appears, select a font, font style and a size. This same font will be used both for the screen display and for the print. To select the sort user the drop down menu to select the Sort Fields, then select whether this fields should be sorted in Ascending or Descending order.

Hide completed projects by checking the check-box on the Project Plan View tab. Hide completed tasks by checking the appropriate box on the Task View tab.
If you are a project manager and don’t have tasks assigned to you then you may turn the tasks section of the Project Center off completely. Check the box next to Hide Task Panel in the Task View.
You should be aware that the view you set for tasks will be the standard view for tasks throughout the system.